

DIY Replacement LED Downlights: Points To Remember
Designed to Last
Right, you are now ready to install your LED downlight yourself. An interesting fact is still many folks opt for halogen or compact fluorescent downlights, however, we must consider LED downlights consume less power as compares to other fixtures and thus would make one save on the power bills. Another benefit that is making those go green initiatives take a new shape is that LED fixtures do not emit anything that is harsh on the environment, no rays, no heat, and no toxic elements. Also, LED downlights are a better option than other lighting as they are designed to last.
Different fixing options
We stock different downlight fixture options:
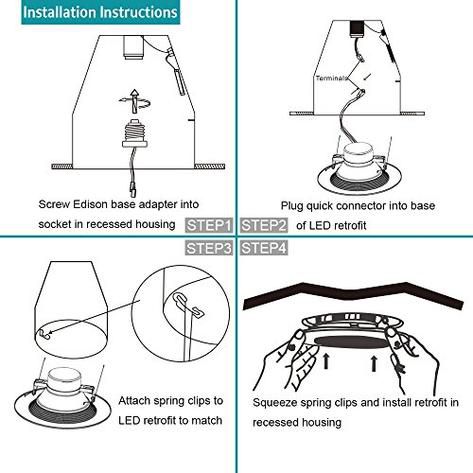
In a downlight with spring clips
In a downlight with twist front face plate/ flexible push in clips
In a downlight where the face plate comes off
Few points to remember before start replacing your LED downlights
We stock different downlight fixture options:
Always switch off the power supply before commencing work.
Operating temperature range of the lamp should be between -20°C and 45°C ambient. Over-heating can affect lamp performance.
Only use in indoor applications and in open fixtures providing 10mm free air space.
Ensure the fixture has the appropriate lamp-holder.
Do not use or install the lamp in highly dusty or smoky environments. It is recommended that you install the lamp only after construction is completed.
Input voltage should be +/-10% the amount stipulated in the specifications.
If LED lamps are dimmable with a compatible mix of transformers and dimmers, actual dimming performance depends on the dimmer type (refer to the recommended dimmer & transformer list).
Please note the different combinations based on the type of lamp and number of lamps.
Not intended to use with emergency light fixtures or exit lights or DC transformers.
Customer may notice a one-second flicker during startup. This is normal and will not affect lamp performance and lifetime.
Relative humidity in the installation should not exceed 80% Relative Humidity. Do not install in bathrooms, kitchens and wet areas. These lamps have no tolerance for water.
Lamps must be protected from the ingress of salt air.
Do not install the lamp close to medical equipment/televisions/studios/radio areas.
Certain lamps include a fan to assist performance. Noise might be audible in a silent environment. (Applicable only to a range of dimmable lamps)
Products are not subjected to more than a total of 20,000 fast switches (time between “on” and “off” should be less than 10 minutes).
Electrical installation in which the product operates must not be subjected to voltage fluctuations. The mains supply should have a surge or overvoltage protection equipment.
It is also recommended that all lamps on one transformer share the same brand.
Installing the downlights
All of our LED Downlights are coming with DIY installation guides, you'll easily find how to install them in place of your existing downlights. Please find this quick video helpful to give a heads up.